Microsoft/Outlook Calendar
How the Microsoft Calendar integration is used
The Chezie MS Calendar integration allows you to:
-
Create events and distribute calendar invites to the people invited to them (in-group members, all employees, etc.).
-
Update calendar invitations if an event is changed
-
Cancel calendar invitations if an event is canceled
-
Track user responses to calendar invites (accepted invite, declined invite, tentative)
How to connect your Microsoft Calendar account
Service account requirements
The application primarily uses:
-
Calendar – requires exchange online
-
Teams (Teams for Business) – for online meetings
The service account should, at the minimum, have a Microsoft 365 Business Basic license.
Creating your service account
From your Azure Admin portal, please create a new user. We suggest giving the user the following information
- First name: [Company]
- Last name: ERGs/BRGs/etc. (whatever your company calls your Groups)
- Email: lastnamefromabove@company.com
Connecting the service account (2026)
-
Log into Chezie via https://[customername].chezie.io
-
Click Settings
-
Click Integrations under company settings
-
Click Add account under Microsoft Calendar integration
-
Complete the oAuth process.
-
If you see this screen, then the application needs to be approved by an admin to complete the connection. Complete steps 6-13.

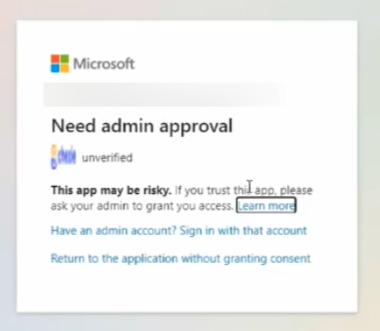
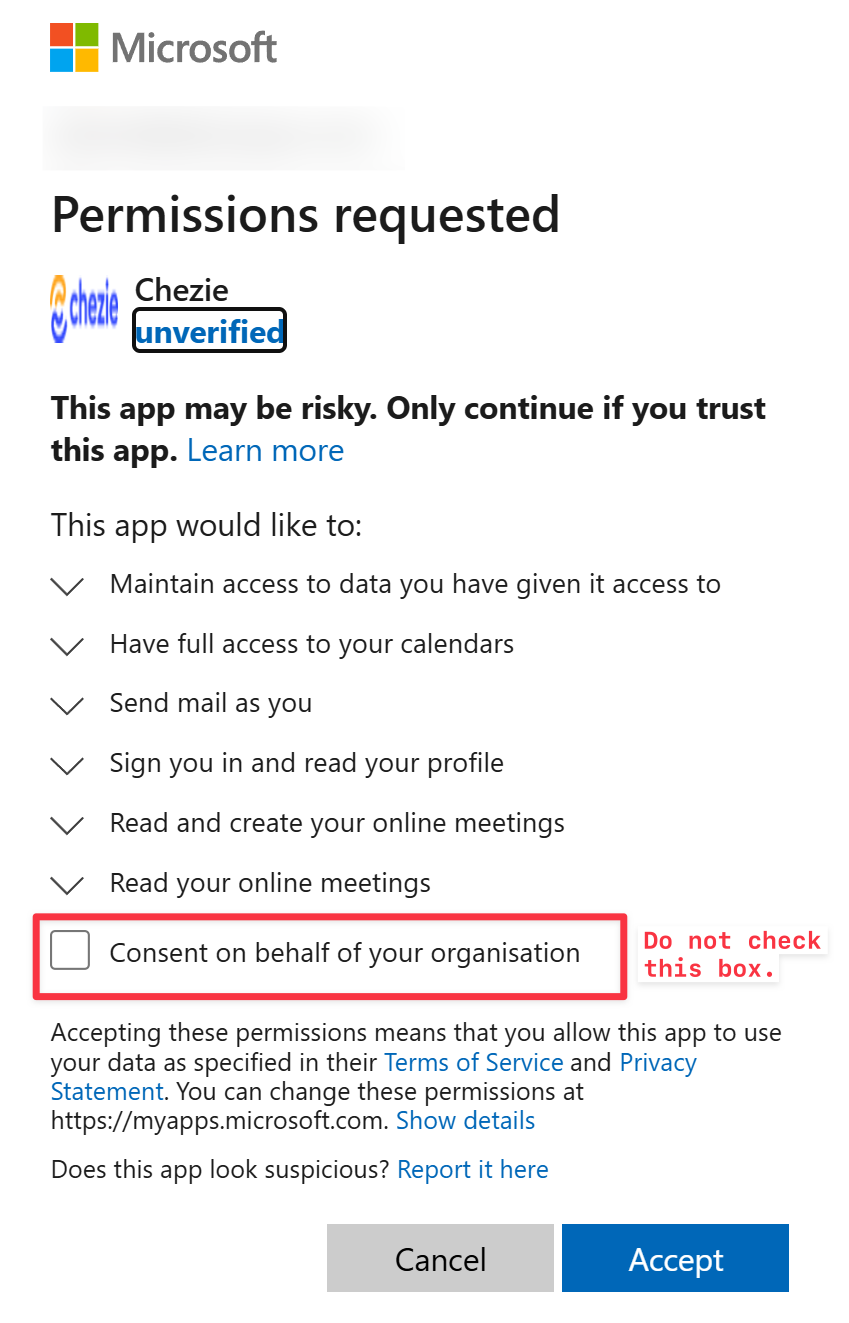
- You will be prompted to accept permissions requests, select Accept.
-
At this point, your integration should be complete.
-
If you gave your service account admin privileges before starting the process, you can remove those privileges in your Azure portal.
-
Go back to your Azure directory and click Enterprise Applications → Chezie.
Click the button to Grant Admin Consent for Default Directory. This enables automatic attendance tracking for MS Teams ERG events.
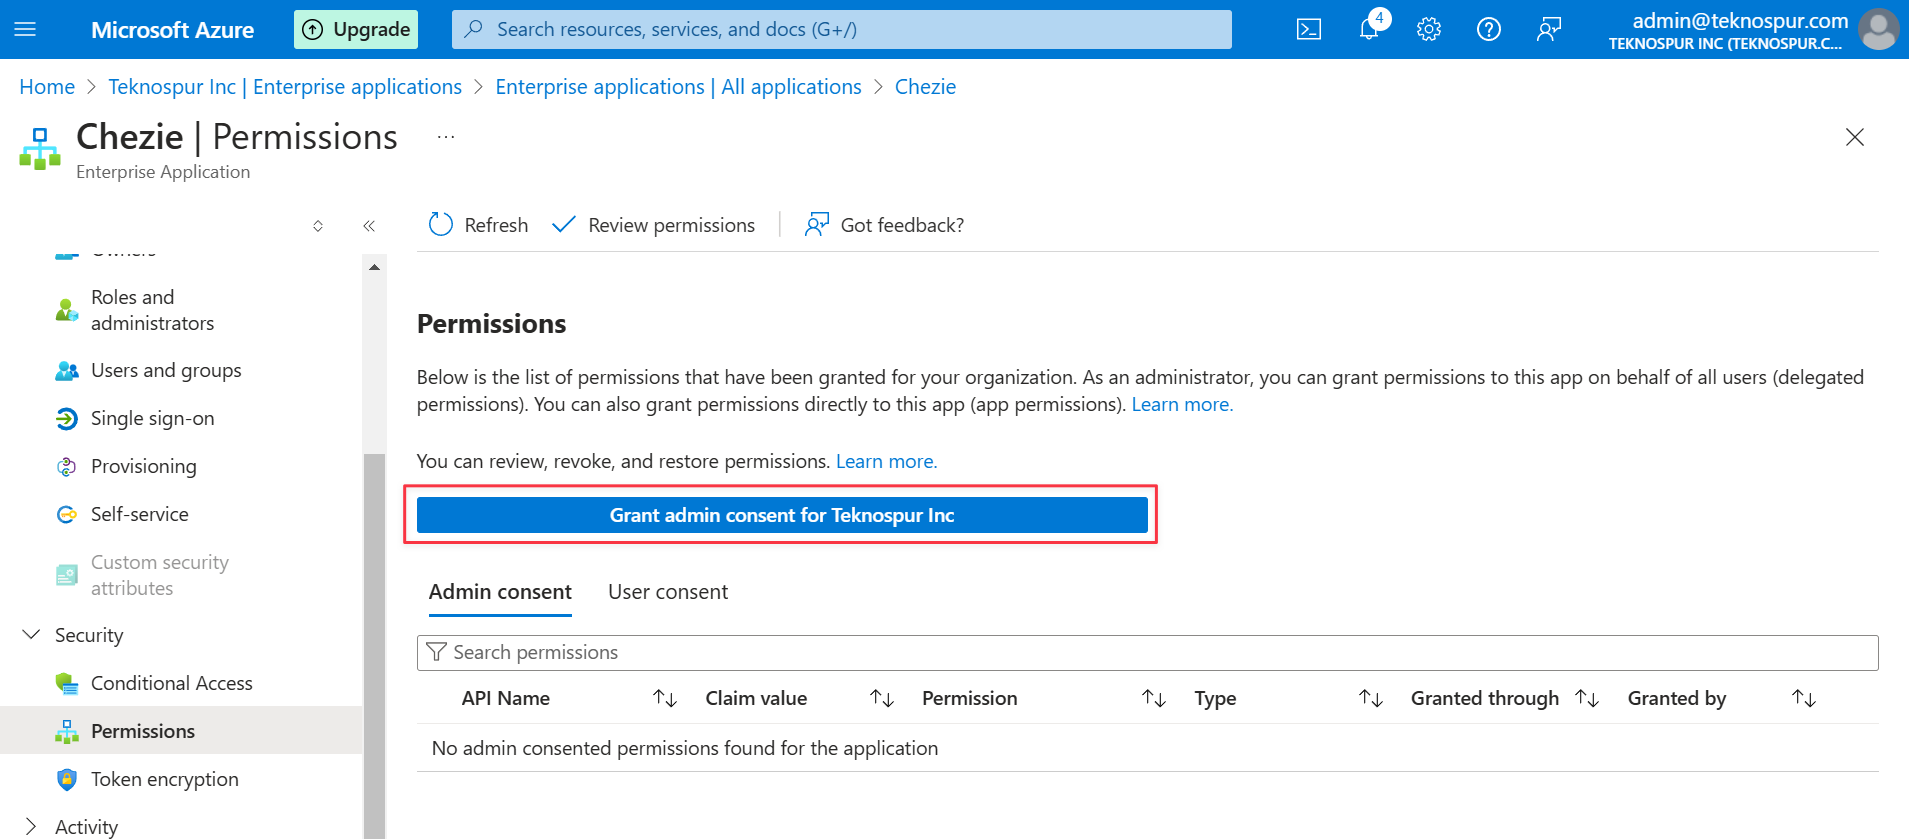
When you click the Grant admin consent button, you’ll see another screen like this. Sign in with your own admin account (not the service account), to accept the permissions.
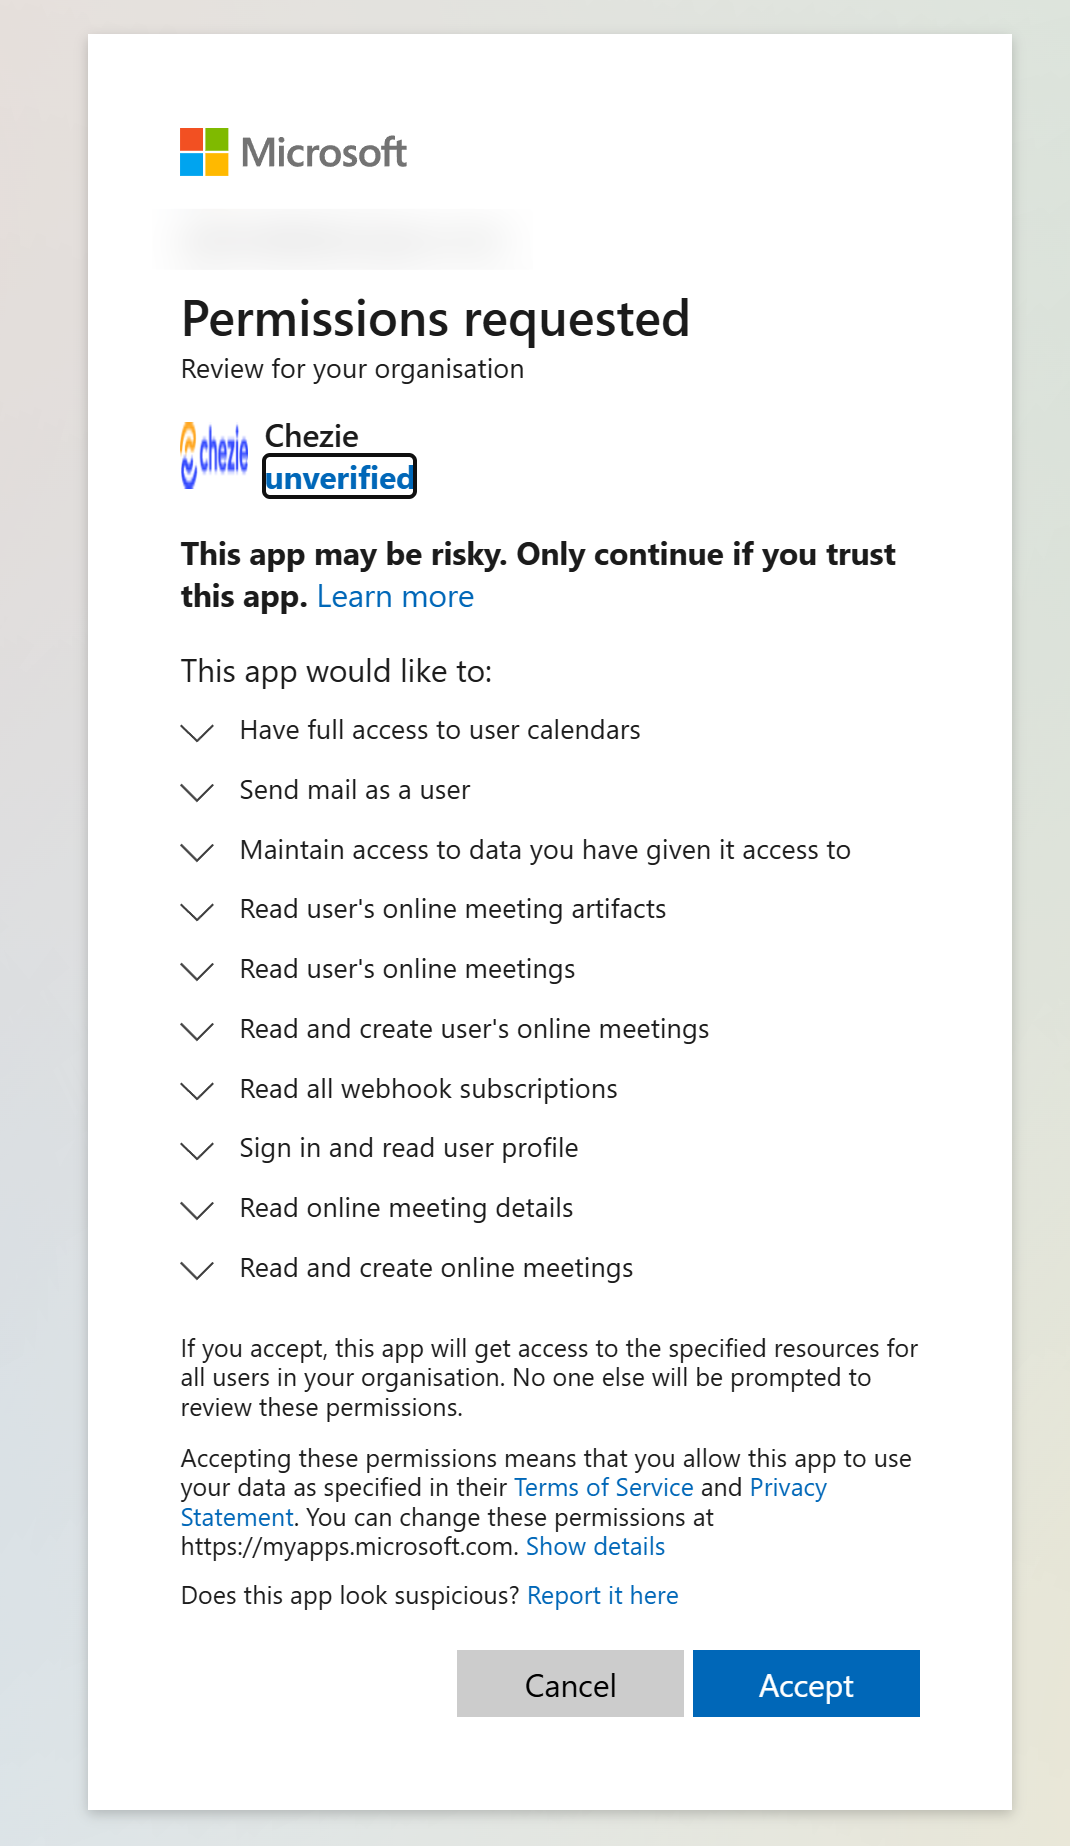
- Now, you should see a screen with the following permissions:
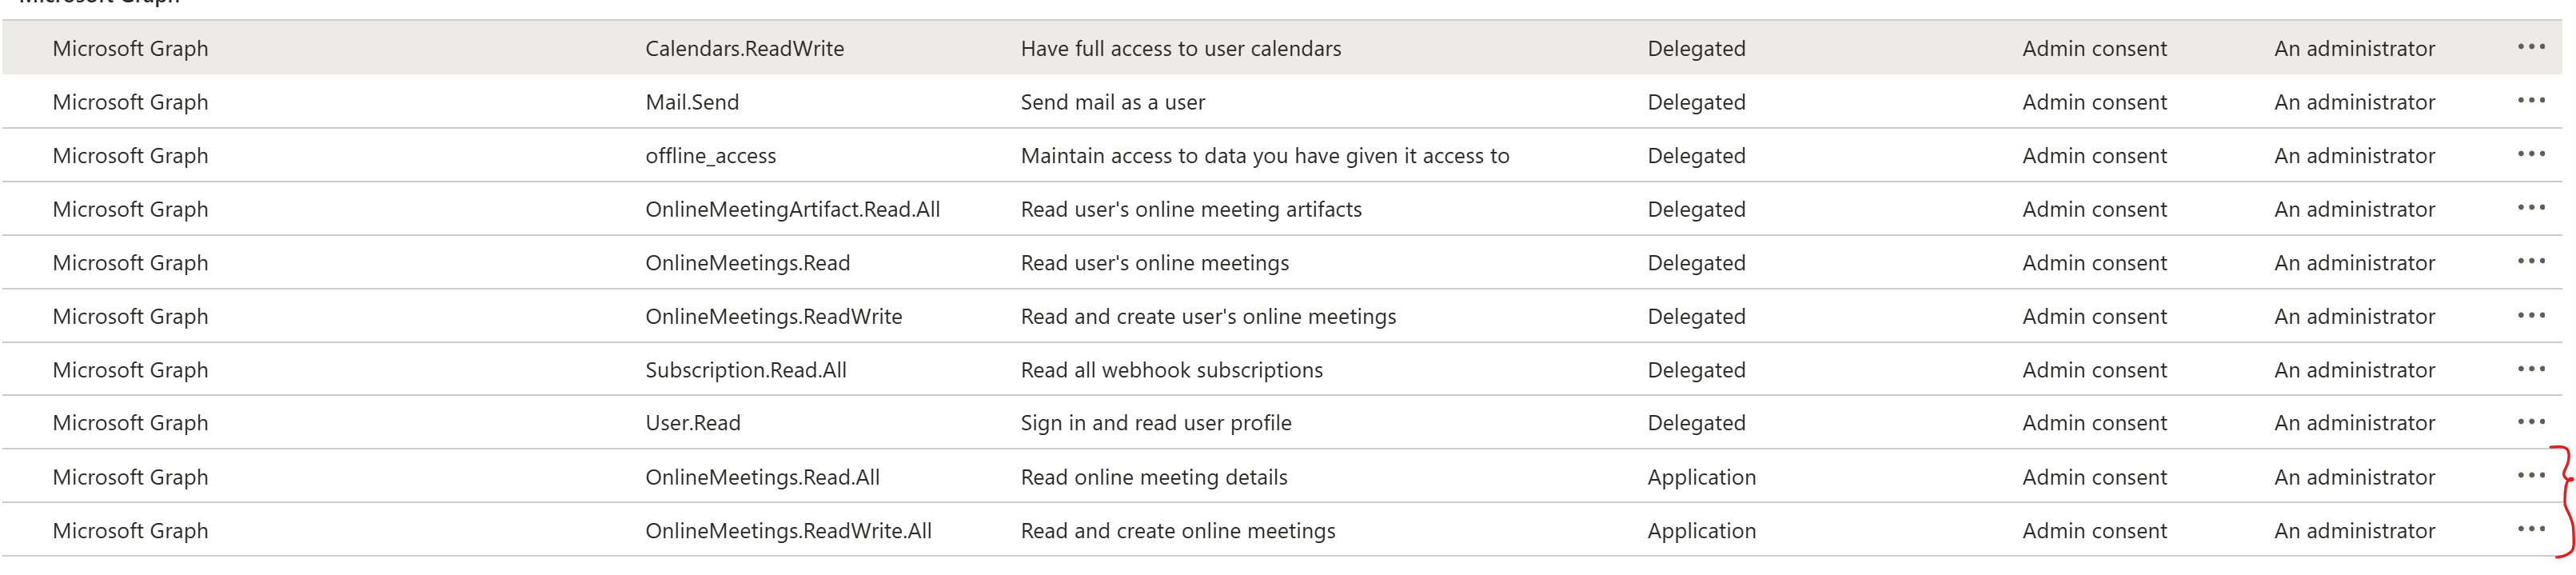
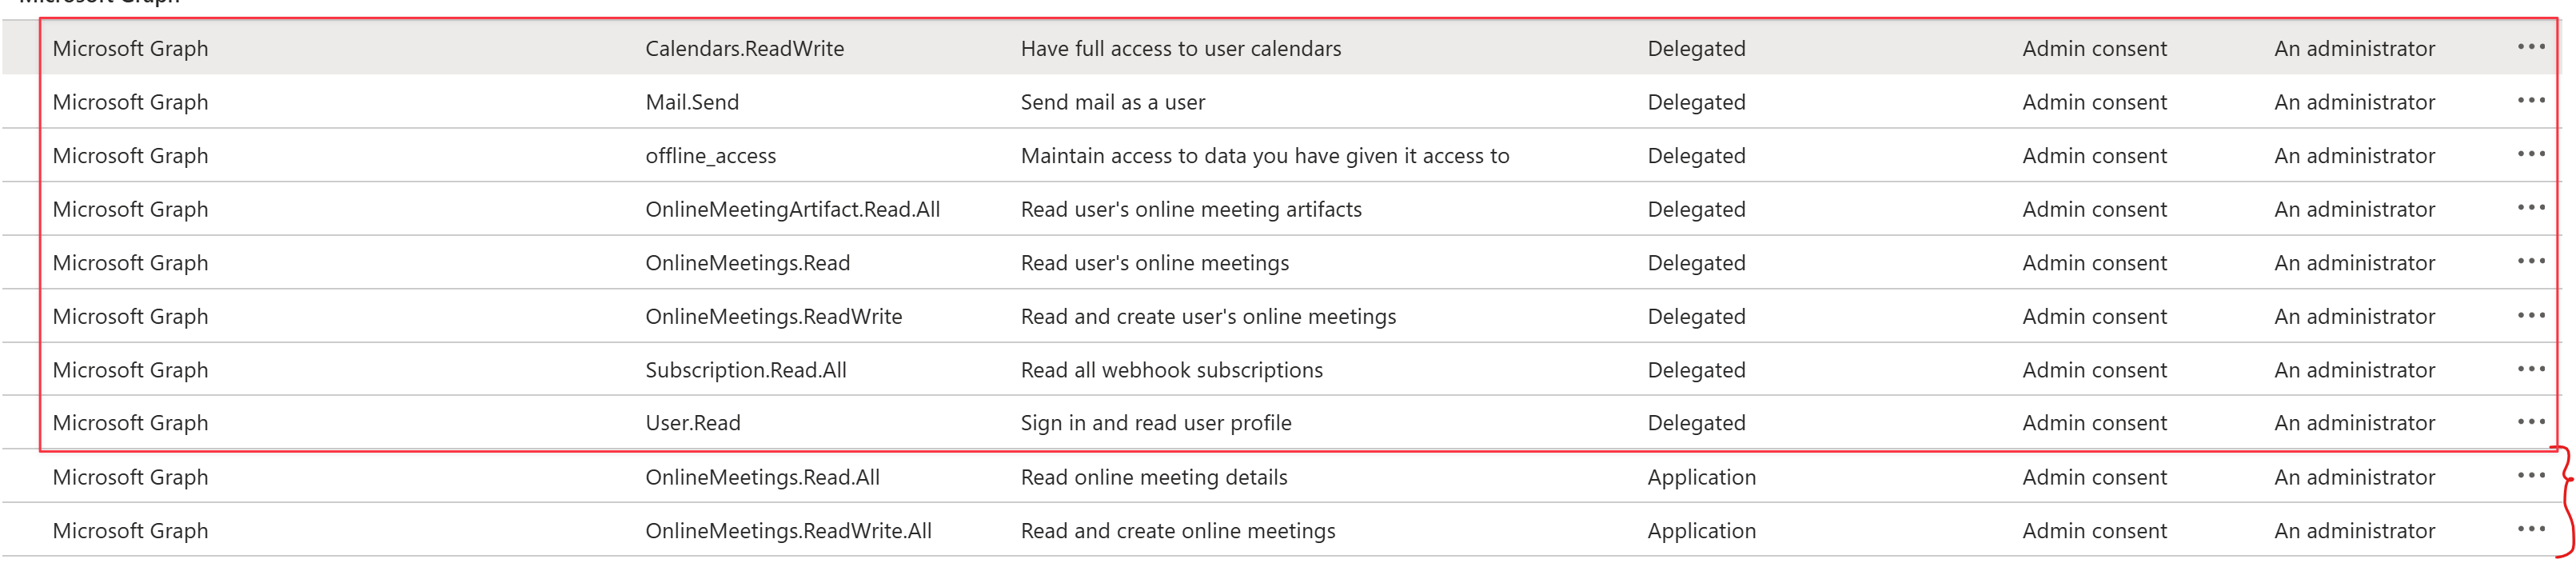
- Delete all of the highlighted Delegated permissions.
- Confirm that only the two permissions in the image below are visible for the Chezie application. If your screen looks like this, then you’re done.
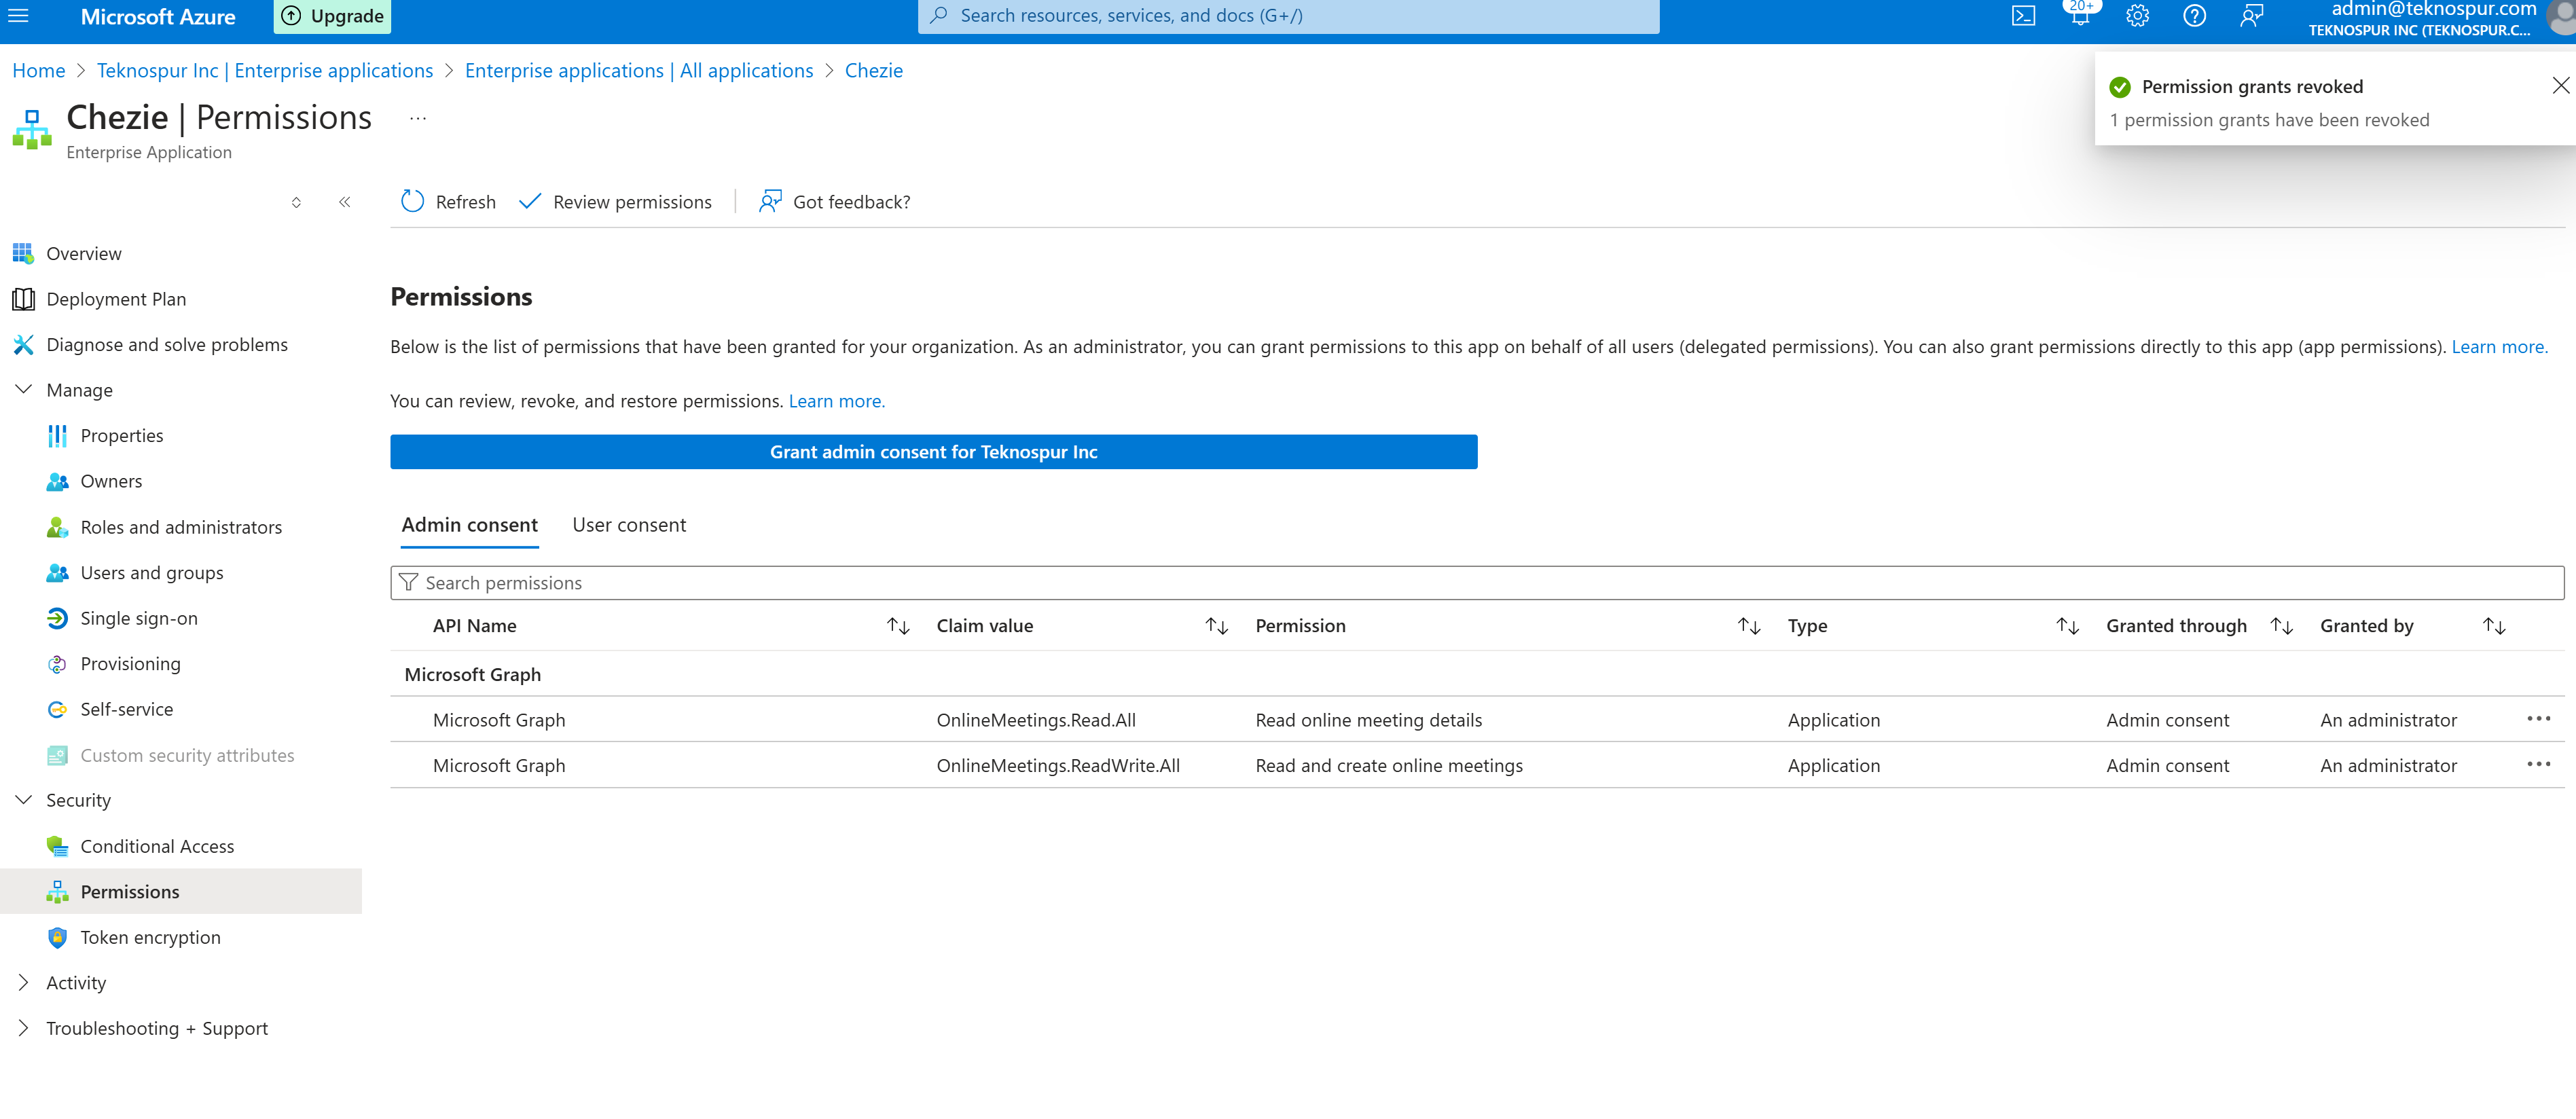
- Email support@chezie.co to confirm that you’ve completed the setup. Thank you!
Microsoft Calendar Integration - IT Details
User role to install app
Owner and Contributor.
Scopes
Microsoft scope reference page here.
Calendar permissions
<table style="min-width: 100px;"> <colgroup><col style="min-width: 25px;"><col style="min-width: 25px;"><col style="min-width: 25px;"><col style="min-width: 25px;"></colgroup><tbody><tr><td colspan="1" rowspan="1"><p><strong>API / Permissions name</strong></p></td><td colspan="1" rowspan="1"><p><strong>Type</strong></p></td><td colspan="1" rowspan="1"><p><strong>Description</strong></p></td><td colspan="1" rowspan="1"><p><strong>Admin consent required</strong></p></td></tr><tr><td colspan="1" rowspan="1"><p>Calendars.ReadWrite</p></td><td colspan="1" rowspan="1"><p>Delegated</p></td><td colspan="1" rowspan="1"><p>Have full access to user calendars</p></td><td colspan="1" rowspan="1"><p>No (granted through user consent)</p></td></tr><tr><td colspan="1" rowspan="1"><p>Mail.Send</p></td><td colspan="1" rowspan="1"><p>Delegated</p></td><td colspan="1" rowspan="1"><p>Read and write user and shared calendars</p></td><td colspan="1" rowspan="1"><p>No (granted through user consent)</p></td></tr><tr><td colspan="1" rowspan="1"><p><a target="_blank" rel="noopener noreferrer" href="http://User.Read"><strong>User.Read</strong></a></p></td><td colspan="1" rowspan="1"><p>Delegated</p></td><td colspan="1" rowspan="1"><p>Sign in and read user profile</p></td><td colspan="1" rowspan="1"><p>No (granted through user consent)</p></td></tr><tr><td colspan="1" rowspan="1"><p>offline_access</p></td><td colspan="1" rowspan="1"><p>Delegated</p></td><td colspan="1" rowspan="1"><p>Maintain access to data you have given it access to</p></td><td colspan="1" rowspan="1"><p>No (granted through user consent)</p></td></tr></tbody> </table>Online meeting permissions
<table style="min-width: 100px;"> <colgroup><col style="min-width: 25px;"><col style="min-width: 25px;"><col style="min-width: 25px;"><col style="min-width: 25px;"></colgroup><tbody><tr><td colspan="1" rowspan="1"><p><strong>API / Permissions name</strong></p></td><td colspan="1" rowspan="1"><p><strong>Type</strong></p></td><td colspan="1" rowspan="1"><p><strong>Description</strong></p></td><td colspan="1" rowspan="1"><p><strong>Admin consent required</strong></p></td></tr><tr><td colspan="1" rowspan="1"><p>Onlinemeetings.ReadWrite</p></td><td colspan="1" rowspan="1"><p>Delegated</p></td><td colspan="1" rowspan="1"><p>Read and create user online meetings</p></td><td colspan="1" rowspan="1"><p>No (granted through user consent)</p></td></tr><tr><td colspan="1" rowspan="1"><p><a target="_blank" rel="noopener noreferrer" href="http://Onlinemeetings.Read"><strong>Onlinemeetings.Read</strong></a></p></td><td colspan="1" rowspan="1"><p>Delegated</p></td><td colspan="1" rowspan="1"><p>Read user online meetings</p></td><td colspan="1" rowspan="1"><p>No (granted through user consent)</p></td></tr></tbody> </table>Online meeting application permissions
<table style="min-width: 100px;"> <colgroup><col style="min-width: 25px;"><col style="min-width: 25px;"><col style="min-width: 25px;"><col style="min-width: 25px;"></colgroup><tbody><tr><td colspan="1" rowspan="1"><p><strong>API / Permissions name</strong></p></td><td colspan="1" rowspan="1"><p><strong>Type</strong></p></td><td colspan="1" rowspan="1"><p><strong>Description</strong></p></td><td colspan="1" rowspan="1"><p><strong>Admin consent required</strong></p></td></tr><tr><td colspan="1" rowspan="1"><p>Onlinemeetings.ReadWrite</p></td><td colspan="1" rowspan="1"><p>Application</p></td><td colspan="1" rowspan="1"><p>Read and create user online meetings</p></td><td colspan="1" rowspan="1"><p>Yes</p></td></tr><tr><td colspan="1" rowspan="1"><p><a target="_blank" rel="noopener noreferrer" href="http://Onlinemeetings.Read"><strong>Onlinemeetings.Read</strong></a></p></td><td colspan="1" rowspan="1"><p>Application</p></td><td colspan="1" rowspan="1"><p>Read user online meetings</p></td><td colspan="1" rowspan="1"><p>Yes</p></td></tr></tbody> </table>Troubleshooting
For Error Mailbox Not Enabled for Rest API:
Make sure the tenant has a Microsoft 365 plan
If none already have a Microsoft 365 subscription, you must purchase one from Microsoft or a certified reseller. Choose a plan that includes Exchange Online, such as Microsoft 365 Business Basic, Microsoft 365 Business Standard, or Microsoft 365 Enterprise plans.
Assign License to User
Once you have the Microsoft 365 license, you can assign it to the user whose mailbox needs to create the online meeting. Here's how admin:
-
Go to the Microsoft 365 admin center (.microsoft.com) and sign in with your admin credentials.
-
In the admin center, go to the "Users" or "Active users" section.
-
Find the user for whom you want to enable Exchange Online (the mailbox user).
-
Select the user and then click on "Edit" or "Product licenses" (the wording may vary depending on the admin center's version).
-
In the license assignment window, check the box for the Microsoft 365 license that includes Exchange Online (e.g., Microsoft 365 Business Basic, Microsoft 365 Business Standard).
-
Save the changes.
Verify Mailbox Setup
After assigning the license, the mailbox should be automatically set up for Exchange Online. You can verify this by checking the user's mailbox settings in the Microsoft 365 admin center or by accessing the Exchange admin center.